Create a Contact
When creating a contact, you can give them access to the Cyxtera Portal and also grant temporary or permanent physical access to your Spaces.
A contact is someone known to your company that you allow to access the Cyxtera portal and/or data center. Each of your staff members that needs portal or data center access must be added as a contact. The same applies for any contractors or other parties that need physical access to your cage.
We set up your initial contact list for you, but it is your responsibility to keep it up to date. Maintaining accurate contacts not only ensures your portal and data center access rights are correct, but also helps us quickly contact the right people when we need to get in touch.
Add Contacts
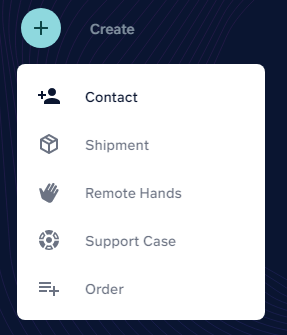
To add a contact, log into the portal and click Create on the navbar. Select Contact.

Alternatively, you can click Contacts on the navbar, and then click Create New Contact on the right.
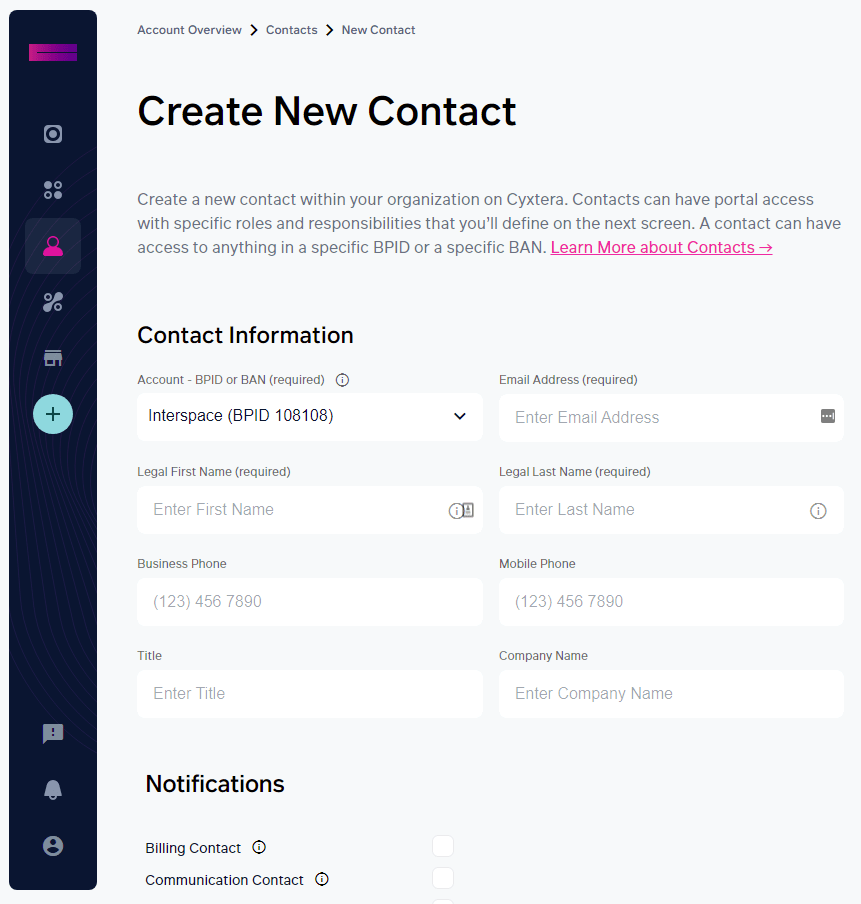
You now see the Create New Contact page.

Adding contact information
The form to add a new contact begins with contact information.
- Choose the Billing Account Number (BAN) you want to add this contact to. The contact will only be able to access and manage spaces associated with this account. Choose the Billing Parent Identifier (BPID) if you want the contact to access all locations.
- Enter the contact’s email address. Portal users will receive an email to set up their password when you create the contact. Those with physical data center access do not receive an email notification when their contact is created.
- Enter the contact’s legal name. They will need to show identification to get access to the data center. If you are creating a contact for a contractor, you need to know the name of the person who will be visiting the data center. You can’t create a contact for a company.
- Add the contact’s business and mobile phone numbers; and their title and company name. These boxes are optional.
Choose notifications
Contacts can receive email notifications that are relevant to their role. Check the boxes beside the notifications you’d like this contact to receive.
Adding a portal account
There are two types of portal user:
- Customer Admins have access to all portal functions, and can create and manage contacts. They can order services, view billing details, and edit their own permissions. We recommend you have at least two Customer Admins.
- Regular Users can view and submit tickets. Regular Users cannot add contacts with portal access. You can upgrade Regular Users with permissions that allow them to add new contacts with data center access, view and manage billing, create orders, and administer tickets for others.
The next part of the form enables you to add portal access.
- Where it says “Will this contact have a portal account?”, choose Yes if you want the new contact to access the Cyxtera portal.
- Enter a username.
- Choose whether this user will be a Regular User or Customer Admin.
- If you are creating a Regular User account, you can grant additional permissions:
- Access Authorization Admin: User can grant access to your data center spaces.
- Access Authorization Temp Admin: User can grant temporary access to your data center spaces.
- Billing Administrator: User can view invoices, payments, and adjustments.
- Order Administrator: User can create new orders.
- Ticket Administrator: User can create and manage support and Remote Hands tickets for others in your account. All Regular Users can view and submit their own tickets.
Adding data center access
The next part of the form enables you to grant data center access.
- Where it says “Will this contact have data center access?”, choose Yes if you want the new contact to be allowed to visit the data center.
- Select the locations you want this contact to access. The locations shown depend on the account BAN or BPID you chose at the top of the form.
- Choose the access type:
- Permanent access grants permission to enter the data center at any time until this permission is revoked.
- Temporary access grants permission to access the data center for a fixed period of time. You can request that those with temporary access are escorted.
- Choose the access timeframe.
- For permanent access, choose the date this should start.
- For temporary access, choose the start and end date of the access period. It can be a maximum of three months. (When the access period has expired, you can grant access for this contact again through the Contacts part of the portal.)
- For those with temporary access, choose an escort if required. You can choose another account contact (for example one of your staff members), or request a Cyxtera escort. If you choose a Cyxtera escort, you can specify whether this is an escort to your space, or whether this contact should be escorted at all times. Cyxtera escorts are billed as a Remote Hands service.
- You can add a reason for visit and notes. These may be useful for your own records, and will also be seen by the security team. If there are any special requirements for this access, notify the security team here.
- Click Create New Contact at the bottom of the form.
- When the contact visits the data center, their biometric details will be recorded and they will be given an access pass appropriate to the timeframe for their access.
Updated 6 months ago