Introduction
The Cyxtera digital exchange network fabric provides customers and partners with an automated platform for interconnection within Cyxtera metro locations. Service provider partners can provide services on the Digital Exchange fabric to any customer that is connected to the same fabric instance. This can be accomplished using the Cyxtera Portal user interface or the REST API.
Digital Cross Connects should work in most scenarios where a standard physical cross connect would be used, with the advantages of rapid deployment and optimized port utilization through multi-tenancy.
This document will outline the various methods for connecting customers and partners via the Digital Exchange Fabric, with specific design recommendations and API examples.
Digital Cross Connect Overview
A Digital Cross connect has the following characteristics:
- Logical Point-to-Point Connection between customers on the Digital Exchange.
- Origination point can be any virtual network(s) on the requestor side.
- Destination is a single Exchange Port or Compute Group.
- Virtual Networks can have different VLAN IDs on origin and destination.
Customer VLANs (A-end) are handed off to a partner (Z-end) as VLANs in an 802.1Q trunk. This, combined with the ability to re-map VLANs, allows partners to use a single CXD port for multiple customers.
Digital Cross Connects are billed to the initiating (A-end) party, just like a standard physical cross connect. However, only a single physical Exchange Port is required to initiate or accept multiple cross connects, which results in lower port consumption on switching gear.
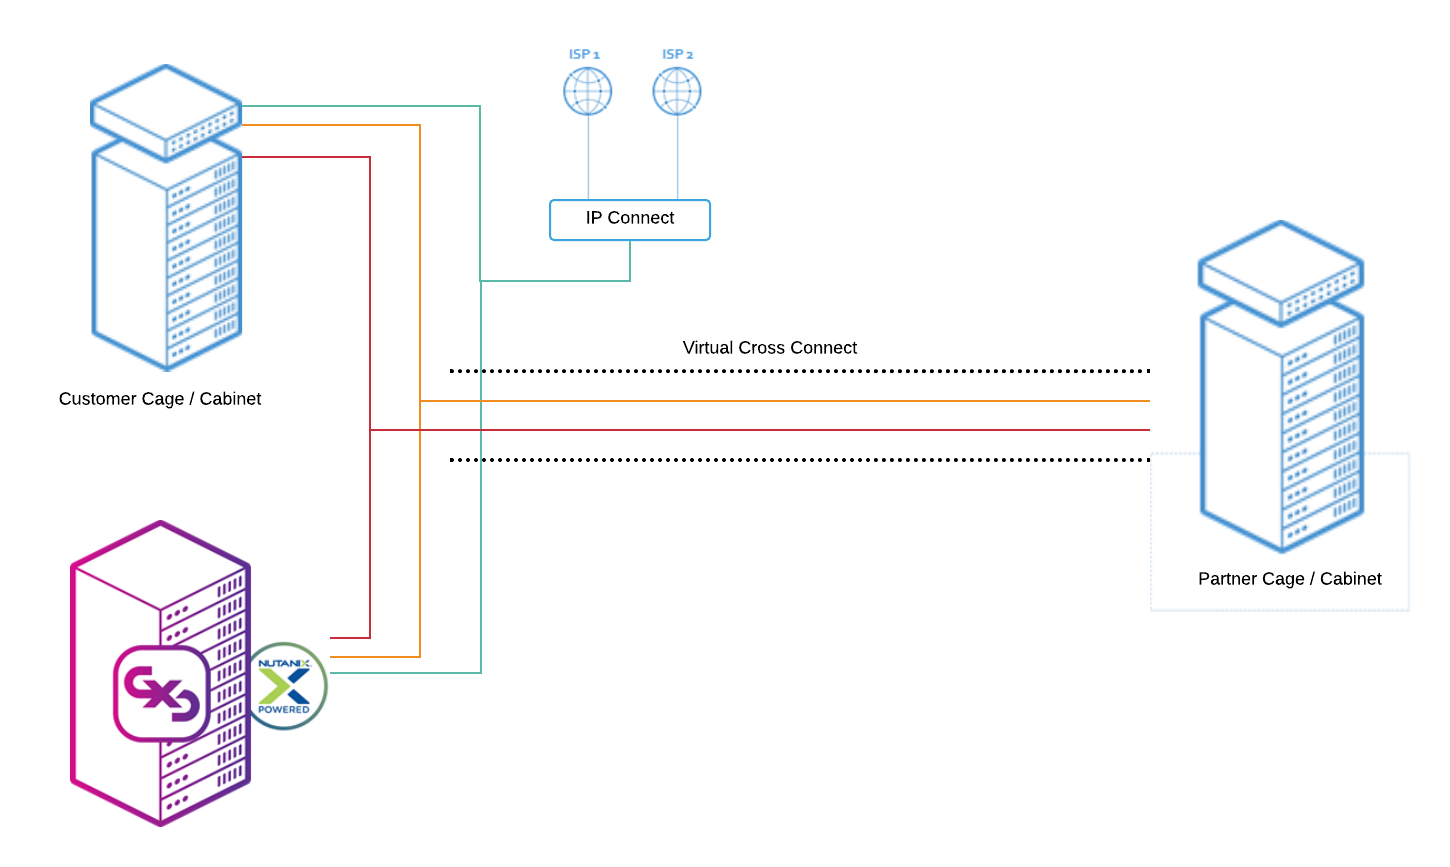
Example Digital Cross Connect
Requirements
A connection between two Digital Exchange tenants has the following requirements:
- Each side must have an Exchange Port or Compute Group.
- The Exchange Port ports and Compute Groups must be in the same metro and same fabric.
- Each side must have access to the Cyxtera Portal or API.
- The A-side must have created at least one Digital Exchange virtual network.
- The Z-side must use a unique VLAN for each inbound tenant VLAN.
Design Recommendations
There are several ways of implementing partner connections using the Digital Exchange network fabric. The design is up to the partner and generally will reflect the way they currently connect to customers using physical cross connects.
Multi-Tenant Implementation
Some partners may prefer to use a single Exchange Port to provide service to multiple customers. This may require re-mapping the customer VLANs to a different set of VLANs to avoid overlap. This is supported in Digital Cross Connects and can be done manually by the Z-end provider or automatically using Virtual Network Pools. When using Virtual Network Pools, a VLAN will automatically be selected from the pool for the Z-end. Additionally, Virtual Network Pools must be configured in advance of accepting any Digital Cross Connect requests.
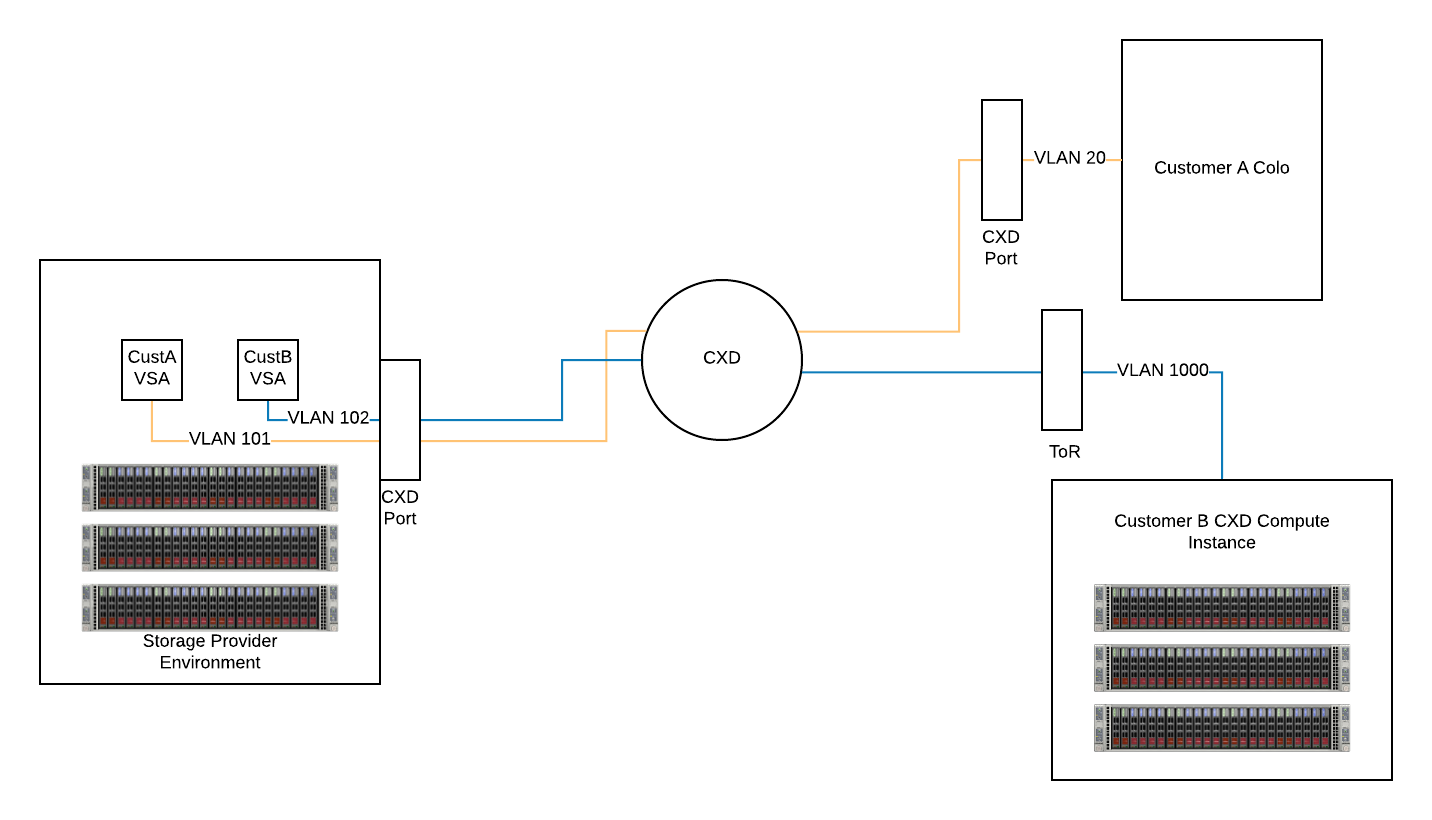
Multi-Tenant Implementation – Example 1
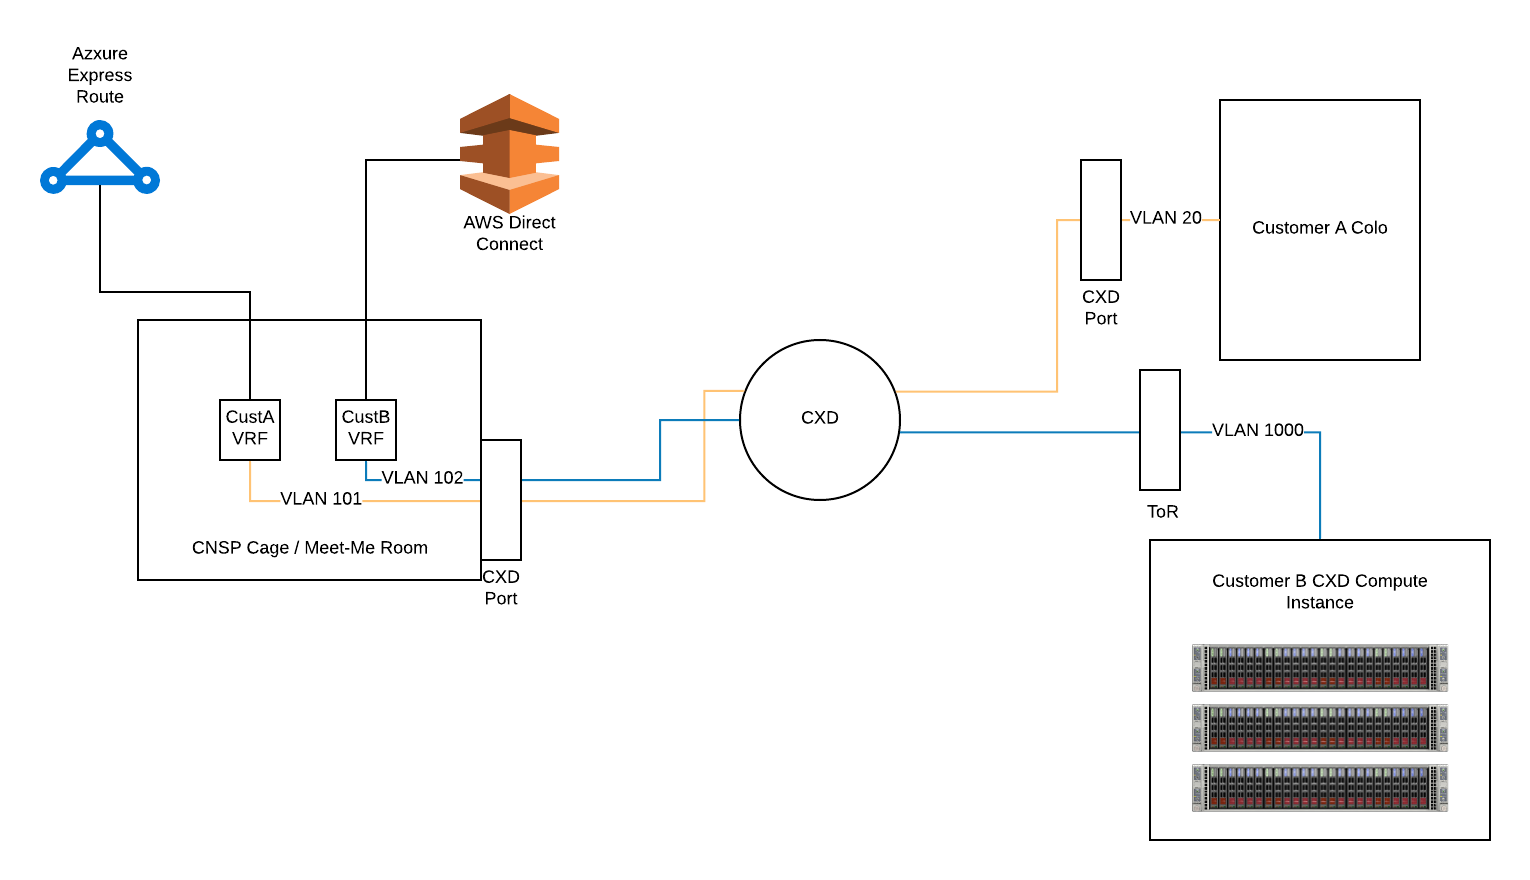
Multi-Tenant Implementation – Example 2
Single-Tenant Implementation
For partners that prefer a single-tenant approach, this is also supported by Digital Cross Connects. In this scenario, the Z-end partner must have a Exchange Port or Compute Group for each tenant and should manually assign the Z-end VLAN if they wish to preserve the original tenant VLAN ID.
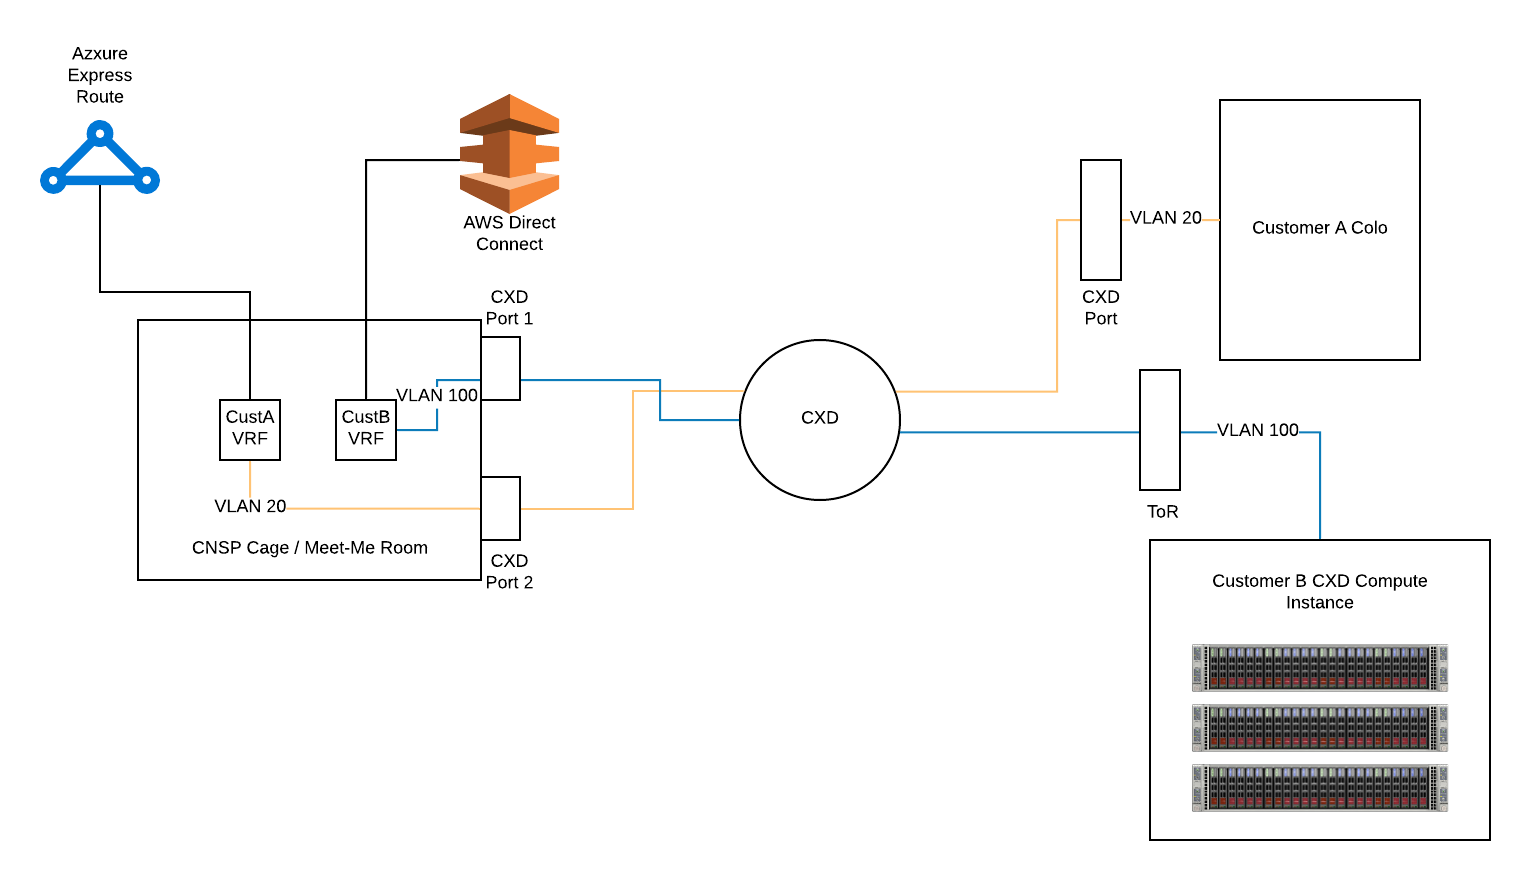
Single-Tenant Implementation – Example 1
Implementation Using the Cyxtera Portal
Partners may choose to manually accept Digital Cross Connect requests using the Cyxtera Portal. This is the recommended approach for scenarios where requests are infrequent, and settings will primarily remain static after the connection is made.
Configure Notifications
Providers can be automatically notified via e-mail when a new connection request is received. This is optional but recommended. Many partners will use a support alias that opens a ticket or notifies the support team that there is a pending Digital Cross Connect request.
Select ‘Account Management’ in the Cyxtera Portal
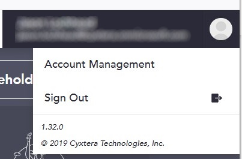
Enter an e-mail address, then click ‘+’ and Save.

Accept Pending Requests
Once a customer has sent a request, you must accept the request to complete the connection. The acceptance requires a few pieces of information.
Navigate to the appropriate metro and scroll down to the ‘Digital Cross Connects’ section.
Here, you should see any pending requests under ‘Inbound Requests.’ Pending requests have a yellow status indicator.
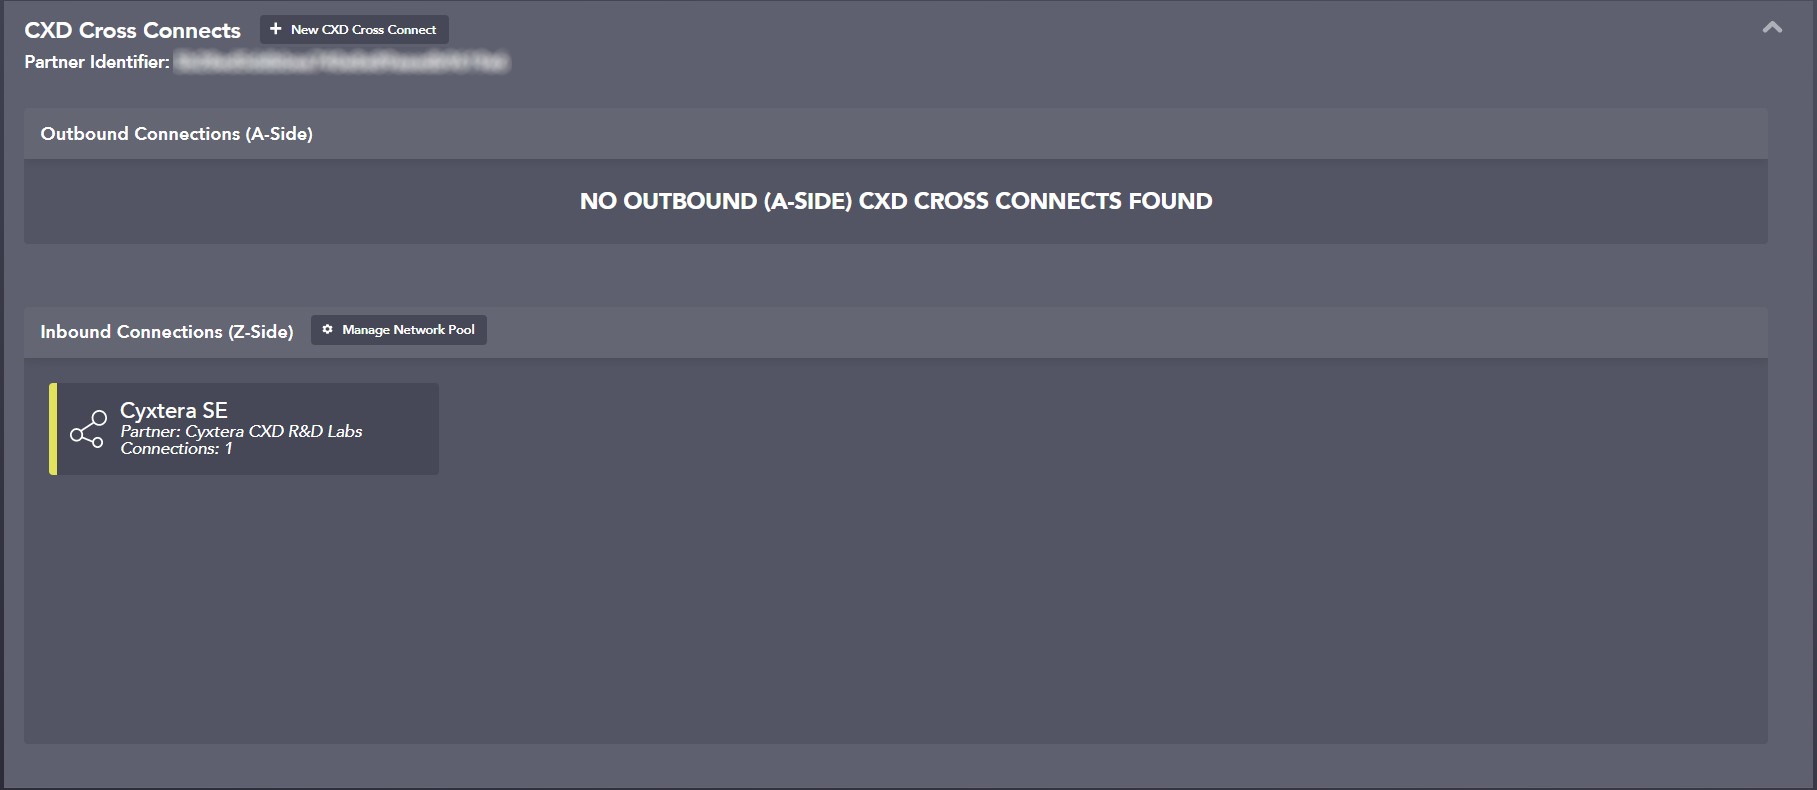
Click the pending request and select ‘Accept/Reject.’
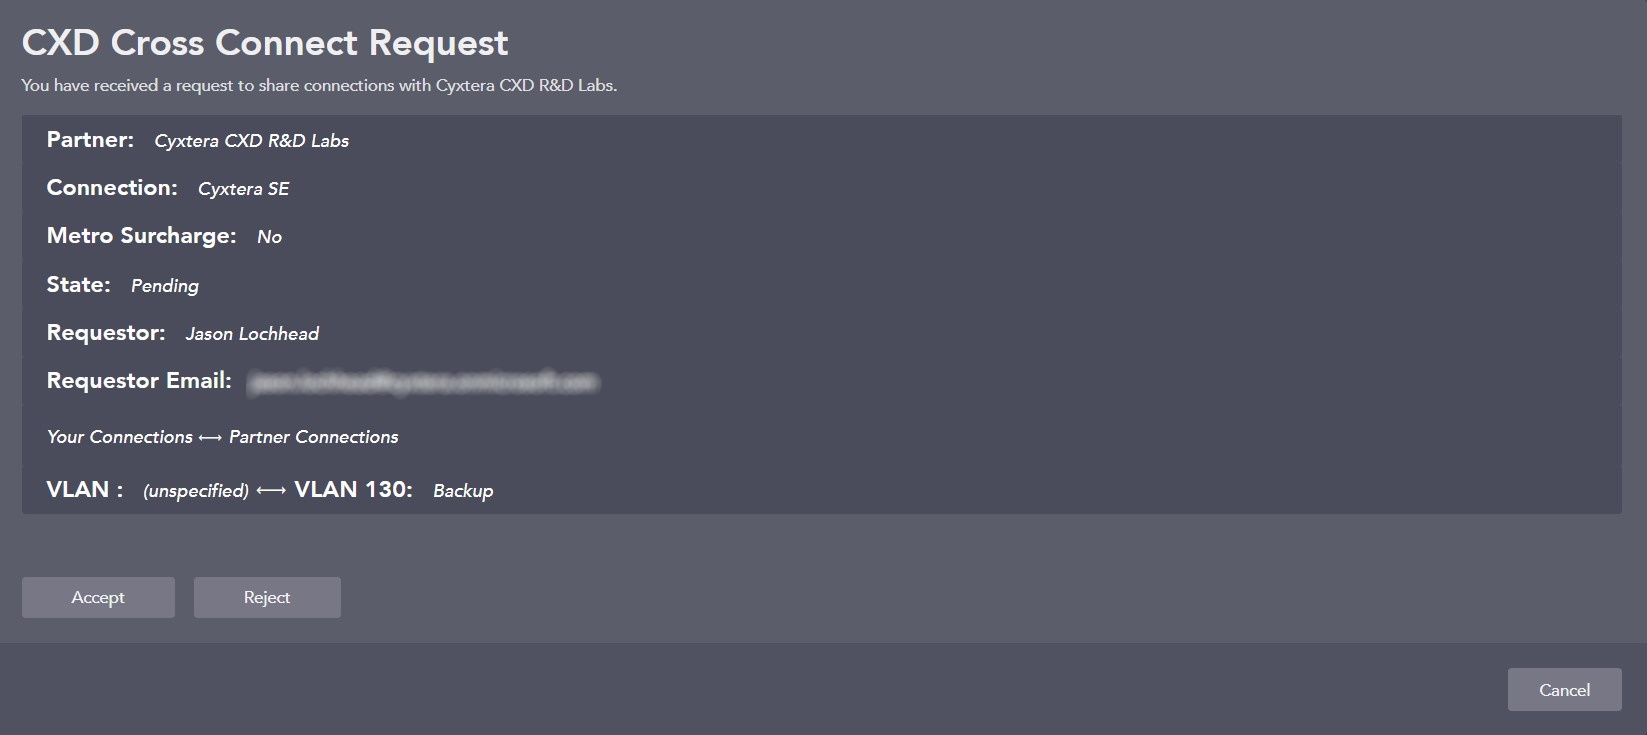
Examine the request and ensure that everything looks correct.
You will see the following information:
Partner — The initiator of the request.
Connection — This is the name the requestor has assigned to this connection.
Metro Surcharge — This indicates whether there is a surcharge for using the CXD Metro connection. Note: The surcharge along with the cross connect fee is billed to the requestor.
State — This indicates the state of the cross connect. It should be in ‘Pending’ at this point.
Requestor — The name of the person who initiated the connection request.
Requestor Email — The email address of the person who initiated the request.
VLAN Information — The VLAN and network name assigned by the requestor. Your VLAN will show ‘unspecified’ at this point in the process.
If all information appears to be correct and this is a valid connection request, click ‘Accept’ to continue.
Complete the Acceptance Workflow
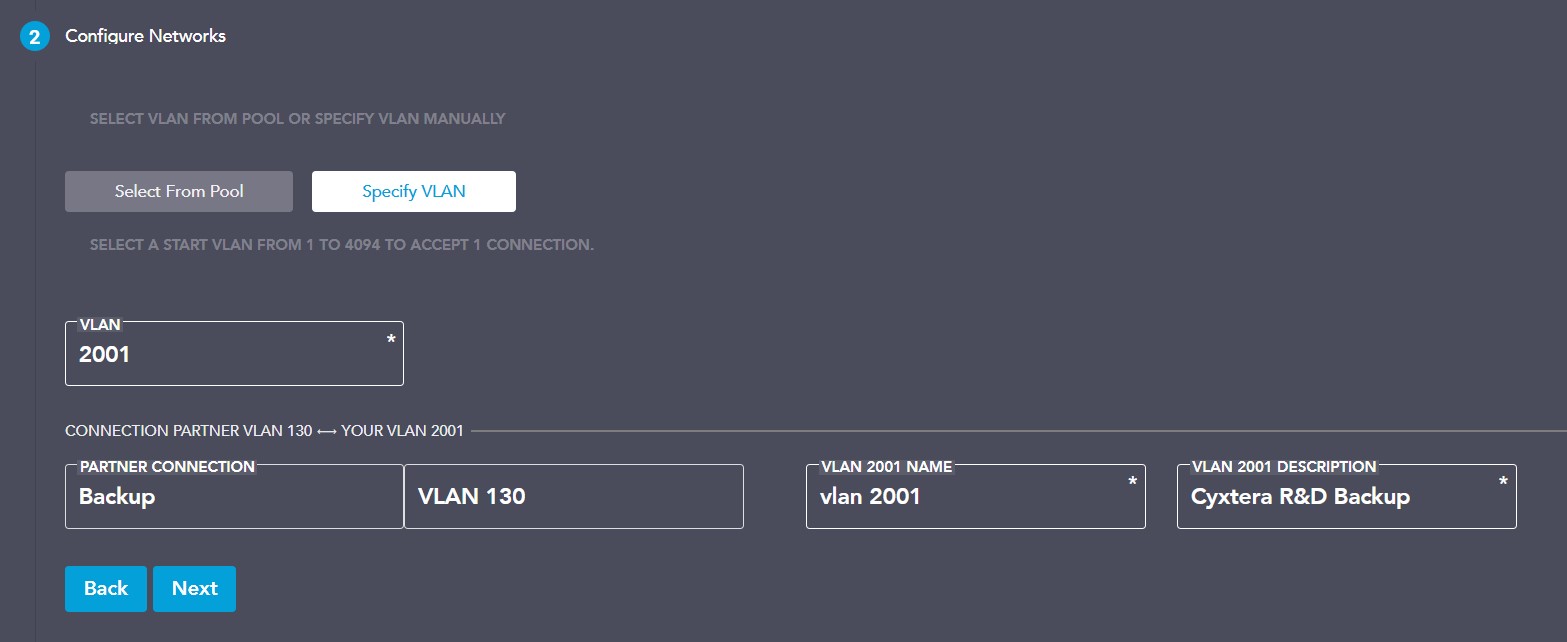
Configure Networks
Here you must provide a unique VLAN for each VLAN the initiator has included in their request. This can be done manually or using Virtual Network Pools. If network pools are used, VLAN information will be dynamically generated.
- VLAN — A unique VLAN from your network. This can be the same as the initiator or a different VLAN, depending on the use case.
- VLAN Name — A friendly name for this VLAN.
- VLAN Description — A meaningful description of the VLAN.
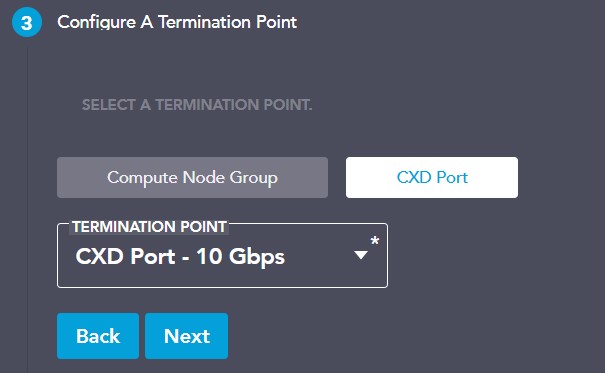
Configure a termination point
The termination point can be a Compute Group or a Exchange Port.
Finalize the connection
Review the configuration and then click ‘Accept Connection’ to complete the connection.
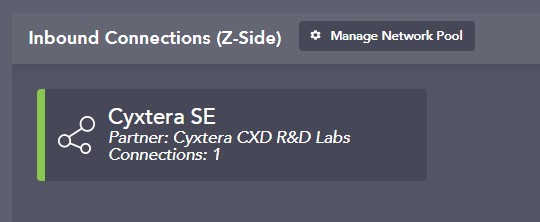
In a few minutes, the connection will be activated, and you can pass traffic between yourself and the initiator. The status indicator will change to green once the connection is activated.
Implementation Using the REST API
All UI functionality leverages the REST API, so the API implementation will follow a similar workflow to the UI implementation.
All API calls can be found at https://cxd.cyxtera.com/docs
Authenticate
Before you can make the API calls required to complete the connection workflow, you must authenticate and retrieve an access token.
API calls require a Client ID and Client Secret. To acquire credentials, please contact Cyxtera support.
API uses Bearer tokens to secure the calls and to make any call, API calls have to send the Authorization: Bearer <BEARERTOKEN> where <BEARERTOKEN> is the token that represents the JWT token the customer needs to pass in a HTTP Request header
To retrieve an API token, please use the following API call:
POST https://auth.cxd.cyxtera.com/oauth/token
Content-type: application/json
Request Body:
{
	"client_id": "<YOUR CLIENT ID>",
	"client_secret": "<YOUR SECRET>",
	"audience": "https://cxd.cyxtera.com/api",
	"grant_type": "client_credentials"
}
The output will return the bearer token in the form of access_token value. Please retrieve the value of access_token from the response and use it as Authorization header for all calls.
Response:
{
    "access_token": "<YOUR ACCESS TOKEN>",
    "expires_in": 86400,
    "token_type": "Bearer"
}
To make additional requests you’ll need your customer ID, the location, fabric ID, and a Exchange Port or Compute Group.
Retrieve Customer ID
You can get your customer ID by using the API call GET /api/current.
Note: You need to use the value “id” not “accountNumber”.
Example
Request:
GET https://cxd.cyxtera.com/api/current
Header:
content-type: application/json
authorization: Bearer <YOUR ACCESS TOKEN>
Response:
{
  "items": [
    {
      "id": 20,
      "accountNumber": 123456,
      "name": "Cyxtera CXD R&D Labs",
      "isVendor": false,
      "partnerIdentifier": "<PARTNER IDENTIFIER>"
    }
  ],
  "type": "application/vnd.cyxtera.fabricmanager.customer.collection.v1+json"
}
Retrieve Locations
To get locations, use the API call GET /api/locations.
Note: Use the value of “id” in subsequent queries for that location.
Example
Request:
GET https://cxd.cyxtera.com/api/locations
Header:
content-type: application/json
authorization: Bearer <YOUR ACCESS TOKEN>
Response:
{
  "items": [
    {
      "id": 1,
      "name": "Dallas, TX",
      "code": "DFW",
      "locationNumber": 1,
      "isActive": true,
      "createdBy": null,
      "createdDate": null
    },
    {
      "id": 2,
      "name": "Washington, DC",
      "code": "IAD",
      "locationNumber": 2,
      "isActive": true,
      "createdBy": null,
      "createdDate": null
    }
  ],
  "type": "application/vnd.cyxtera.fabricmanager.location.collection.v1+json"
}
Retrieve Fabric IDs
To get the fabric ID, use the API call GET /api/locations/{locationId}/fabrics.
Note: Use the value of “id” in subsequent queries for that fabric. Normally, there is only a single fabric per location.
Example
Retrieve fabrics IDs for location 1 (DFW)
Request:
GET https://cxd.cyxtera.com/api/locations/1/fabrics
Header:
content-type: application/json
authorization: Bearer <YOUR ACCESS TOKEN>
Response:
{
  "items": [
    {
      "id": 1,
      "name": "Dallas - Commercial",
      "locationId": 1,
      "fabricNumber": 1,
      "isActive": true,
      "createdBy": null,
      "createdDate": null
    }
  ],
  "type": "application/vnd.cyxtera.fabricmanager.fabric.collection.v1+json"
}
List of Locations and Fabrics – Current as of 9/13/2019
This chart is provided for reference, but for up-to-date information it is best to query the API.
| ID | Name | Location Code | Fabric IDs |
|---|---|---|---|
| 1 | Dallas, TX | DFW | 1 |
| 2 | Washington, DC | IAD | 2 |
| 3 | London, UK | LHR | 3 |
| 4 | Chicago, IL | ORD | 4 |
| 5 | New York / New Jersey | EWR | 5 |
| 6 | San Francisco | SFO | 6 |
| 7 | Atlanta, GA | ATL | 7 |
| 8 | Boston, MA | BOS | 8 |
| 9 | Los Angeles, CA | LAX | 9 |
| 10 | Phoenix, AZ | PHX | 10 |
| 11 | Amsterdam, NL | AMS | 11 |
| 12 | Frankfurt, Germany | FRA | 12 |
Retrieve Exchange Port
To accept a cross connect request, you must terminate the cross connect to either a Exchange Port or a Compute Group. To retrieve your Exchange Port, use the ‘Get Colocation Ports’ call.
GET /api/customers/{customerId}/fabrics/{fabricId}/colocationPorts
Example
In this example, we will retrieve all colocation ports in location 2 (IAD)
Request:
GET https://cxd.cyxtera.com/api/customers/20/fabrics/2/colocationPorts
Headers:
content-type: application/json
authorization: Bearer <YOUR ACCESS TOKEN>
Response:
{
  "items": [
    {
      "id": 127,
      "status": {
        "id": 4,
        "name": "Installed"
      },
      "name": "IAD1-A Cage 1",
      "portType": {
        "id": 1,
        "name": "Fiber"
      },
      "location": {
        "name": "Washington, DC",
        "code": "IAD",
        "number": 2
      },
      "portspeed": {
        "id": 2,
        "name": "10 Gbps"
      },
      "fabric": {
        "id": 2,
        "name": "Washington DC",
        "number": 2
      },
      "customer": {
        "id": 20,
        "accountNumber": 123456,
        "name": "Cyxtera CXD R&D Labs"
      },
      "ESI": "00:00:00:00:00:2:2::b:",
      "circuitId": "1234-45-23",
      "ports": [
        {
          "id": 253,
          "switchName": "IAD1-A632678LEF001",
          "port": 0
        },
        {
          "id": 254,
          "switchName": "IAD1-A632678LEF002",
          "port": 0
        }
      ],
      "productCode": "DIMCCXDUS10G",
      "networkingType": {
        "id": 2,
        "name": "Layer 2 with LACP"
      }
    }
  ],
  "type": "application/vnd.cyxtera.fabricmanager.colocationPort.collection.v1+json"
}
In this example, we have a single Exchange Port with ID 127 available in IAD.
Retrieve Requests
To retrieve pending requests, you will need to call ‘Provider Cross Connects’ and filter by state to get pending connections.
GET api/providers/{providerCustomerId}/fabrics/{fabricId}/crossConnects?state=pending
Example
Request:
GET https://cxd.cyxtera.com/api/providers/20/fabrics/2/crossConnects?state=pending
Header:
Accept: application/json
Authorization: Bearer {YOUR ACCESS TOKEN}
Response:
{
  "items": [
    {
      "id": 14,
      "name": "R&D Connection",
      "customer": {
        "id": 20,
        "accountNumber": 123456,
        "name": "Cyxtera CXD R&D Labs",
        "identifier": "<A-SIDE PARTNER IDENTIFIER>"
      },
      "fabric": {
        "id": 2,
        "name": "Washington DC",
        "number": 2
      },
      "location": {
        "id": 2,
        "name": "Washington, DC",
        "code": "IAD"
      },
      "requestor": {
        "name": "Your Customer",
        "email": [email protected]
      },
      "partnerAccount": {
        "identifier": "<Z-SIDE PARTNER IDENTIFIER>",
        "name": "Cyxtera SE"
      },
      "type": {
        "id": 1,
        "name": "Cross Connect",
        "productCode": null,
        "remote": false
      },
      "state": {
        "id": 1,
        "name": "Pending"
      },
      "connections": [
        {
          "partnerVirtualNetwork": {
            "vlan": 99,
            "description": "MonitoringNET"
          }
        }
      ]
    }
  ],
  "type": "application/vnd.cyxtera.fabricmanager.crossconnect.v1+json"
}
In this example, the partner “Cyxtera SE” has initiated a cross connect request. Its ID is “14” and the state is “Pending”
There could be more than one pending request, so you’ll need to parse the response and determine which request you would like to accept. This can be done by the partner identifier or the partner name, which you’ll have to get from the customer in your application.
Accept Requests
To accept a request, you must use the ‘Accept Cross Connect’ call and pass the appropriate information in the body.
Example
In this example, we will accept the cross connect request from the previous example.
The partner (Cyxtera SE) is using VLAN 99, but we will remap to VLAN 199 on our side of the connection.
We will terminate the connection on our CXD port with ID 127.
Note: This example is NOT using VLAN pools.
Request:
POST https://cxd.cyxtera.com/api/providers/20/fabrics/2/crossConnects/19/accept
Header:
Accept: application/json
Authorization: Bearer {YOUR ACCESS TOKEN}
Request Body:
{
 "connections": [
    {
      "virtualNetwork": {
        "vlan": 199,
        "name": "Cyxtera-Monitor",
        "description": "Monitoring Network"
      },
      "partnerVirtualNetwork": {
        "vlan": 99
      }
    }
  ],
  "terminationPoint": {
    "cxdPortId": 127
  }
}
Response:
{
  "id": "24C8452E-77D9-E911-B5E9-0004FFE62707",
  "state": {
    "id": 4,
    "name": "PENDING"
  },
  "fabric": {
    "id": 2,
    "name": "Washington DC"
  },
  "location": {
    "id": 2,
    "name": "Washington, DC"
  },
  "entity": {
    "id": 19,
    "name": "R&D",
    "type": {
      "id": 9,
      "name": "Cross Connect"
    }
  },
  "customer": {
    "name": "Cyxtera CXD R&D Labs",
    "id": 20,
    "accountNumber": 123456
  },
  "originator": null,
  "name": "Accept Cross Connect",
  "createdDate": "2019-09-17T18:15:52.217Z",
  "completedDate": null,
  "executionId": null,
  "user": {
    "id": null,
    "name": null,
    "email": null,
    "identity": null
  }
}
Once the cross connect request has been accepted, the system will complete configuration of the network and connectivity will be established.